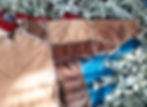
Hello! I thought I would dissect for you some of the process that went into the construction of this vegetable tanned domestic rabbit fur garment.

This shirt follows a construction method belonging to traditional garment making. What I mean by this is the design of garments created and worn by people of many, many cultures of the world before the mechanization of textiles which made fabric cheaper and faster to produce. It looks different from modern garments mainly due to being made of large geometric shapes, especially rectangles. It's also "baggy" rather than form-fitting. We might call this free-fitting or one-size fits most.
Prior to industrialization, many fabrics of the world were woven on relatively narrow, hand held looms. Weaving like this creates a rectangle of fabric of a limited width and unlimited length. It also means that every portion of fabric is precious. Not only were those nettle, flax, or hemp stalks, sheep or alpaca wool, or silk moth cocoons harvested and processed by hand, they were spun by hand, and dyed by hand with hand-harvested plants and other magical ingredients. By skilled hands, wise hands, loving hands. The hands of grandmothers and great-grandmothers, daughters of women who painstakingly taught the detailed crafts they themselves had learned from the fingers of their own mothers.
So you see, this was a sacred kind of work. And garments were known as magical things. A second skin embedded with the protection, wisdom, and stories of your ancestors, to remind you that you are god, and of the unique way that the spirits move through the land, plants, and animals of your homeland, bonded as is a mother tree to a sapling, to its people. To You.
So...it wouldn't make any sense to slice and dice that beautiful and valuable length of nettle fabric by making crazy loop-de-loops that leave great amounts of fabric as wasted scrap. Rather, you would want to preserve the entirety of that holy rectangle, as much as possible. You would also want to make garments which could be handed down from person to person without needing to be re-fitted and re-tailored. Meaning you would want a garment that isn't "sized" in the way modern garments are. Because, in many cases, you would expect that garment to last a very long time and possibly to have multiple wearers.
Traditional garments made from animal hides tend to follow these philosophies also. Because, after all, a tanned hide is roughly the shape of a rectangle, though it have irregular edges. If you've ever naturally tanned an animal hide before, then you know a secret the modern world doesn't know. You know, in your body and in your spirit, how much work it truly took. You know how obvious it is that it is something precious and sacred. And something which contains a piece of yourself.
Many of the hide garments, hats, & bags that I make involve no cutting of hides at all or very little cutting. This garment required the most hide cutting I've ever done. But it still exemplifies the construction methods of a traditional garment.
Here's a look at the other views of the shirt:


Here's my original sketch for the garment.
As you can see, the extra triangles and rectangles added to the sleeves on the finished garment are not an intrinsic part of the design. They were simply a creative way to fill in the gaps of hides which were not quite as big as I needed or which had holes/spaces due to the hide's irregular margin.
If I had bigger hides, like say sheep, its possible that this garment could be made with only three or four hides. Each sleeve could be made from one hide instead of two.
Here are the hides when I first laid out the garment's concept, before any cutting or construction had begun. Here you can clearly see that this garment is just made up of nine rectangles. Nine hides, seven of them folded in half.

And here is one of my favorite garment books. Look familiar? The garment on the cover is a hand-embroidered traditional dress from Syria. If you subtract the length of the dress to that of a shirt, the construction of this garment is, for the most part, identical to that of my rabbit shirt.

I've been carrying around this book for at least ten years. For a nomad, that means a lot, because due to constantly picking up and moving, very little, save anything has traveled with me for that long, except for maybe a family heirloom necklace. This book was my first introduction into the science and spirit of traditional garment making, and to this day, it has been one of the most formative influences in how I make things. If you are interested in traditional garments, I suggest you buy it and read it.
The author dedicated her life to understanding many of the world's most ancient garments. In some cases, by scrutinizingly re-mapping designs based solely upon old black and white postcard photographs of indigenous people, with mislabeled captions reflecting the exoticism seeking colonial gaze of the era. Granted, some of the tone of the writing in this book is a bit dated. That doesn't keep it from being an invaluable resource to the modern garment maker.
Back ten years ago when I first read about the philosophies outlined in this book, I was making things like Moroccan burnooses, linen smocks, and dresses and corsets styled from Jane Austen's Regency period of England (obviously not the kind of garment I'm talking about now!), ticking away on a fussy hand-crank antique White Rotary sewing machine in a dark little corner of a dilapidated house in Washington state. I loved that sewing machine. It compares only to the 1950s electric Singer which belonged to my grandmother.
These days, most of the garments I make come from leathers and furs I have tanned, rather than from fabric. And though natural leather does behave differently from woven fabric in some important ways, and methods of stitching leather are different, a Sioux brain tanned elk hide dress of the North American plains, for example, shares a lot in its manner of construction with, say the loom-woven fiber huipil garment of indigenous people of Mexico, or with the Syrian dress I already mentioned. It's almost like there's a similar spirit, or some shared, deep human mystery within all of their arrangements.
Now back to this rabbit fur shirt. If you take a rectangular piece of fabric or a roughly rectangular hide, fold it in half length-wise, and cut either a slit or a circle in the middle (for your head to fit through), then you have the most primary of all traditional garments. Tie a sash around your waist, and it is ready to wear. Or, stitch or tie the two sides of the garment together, a fair distance down from your armpits, and you have a buckskin shirt. Or a huipil.

Because a rabbit hide is too small to fold over into the torso of a garment, I needed a yoke. A yoke is a smaller piece of hide (or fabric) to go over the head, to which other hides (or rectangles of fabric) can be attached. In many elk hide dress of the plains, the top, horizontally arranged hide which goes over the head and also down the arms as sleeves, essentially serves as the yoke, to which the length of the dress is sewn.

In order to conserve my hides as much as possible, I opted to simply cut two very small rectangles from the middle hide (the brown leather colored one that would be at my head & shoulders) to connect the front and back hides. These served as the yoke. And it meant that I had usable rectangles left from that hide to add patching to the back of the sleeves. Constructing a garment with limited material is always a mathematical dance. Like cutting all the pieces for a coat from a single wool blanket. You have be mathematically creative! Because you only get to cut once.
But, given differently sized or shaped hides, the torso of this garment could easily have looked like this:

Or, the torso of the garment could have could have been one large hide, like this buckskin shirt, already pictured in one of the above drawings:

So, after the main torso of the hide, the sleeves are just two long rectangles with a slight taper. Make sure to keep the sleeve width very wide at the elbows, so you can bend your arm fully without stressing the seem there. So, the taper is slight until about a couple inches past the elbow. Then the taper increases dramatically to the wrist.

The width of the side panel inserts is up to you. They'll affect how baggy the garment is. You want to be able to easily slide the garment on and off over your head (unless the garment was completely open in the front and buttoned closed). My inserts are quite wide. Mainly because I can't stand claustrophobic armpits. I like my arm pits to have tons of space.
And remember, in Winter garments, bagginess is a really good thing. Traditional Winter garments. are. loose. and. baggy. I repeat. They're loose! You want plenty of space to be able to wear at least one layer of clothing underneath your furs (so that you don't ever need to wash the fur garment). You need to be able to move freely. And, when you have another layer covering this one (like say, my wool coat), or your baggy fur garment is gathered together with a belt or sash, all that gathered bulk, full of air pockets, is what keeps you warm warm warm! Air is what keeps you warm!

Now lets talk about arm pits. Either cut a line or keep the seam open for several inches along both sides of the arm pits. Here, I left about three inches on both sides. Have you ever tried to lift up your arms when wearing a blazer jacket? We all have. It sucks. You really can't lift your arms up all the way, and if you're able to, the entire jacket moves up with them. And it's. not. comfortable. These slits give your arms complete free range of motion. You can lift them up to the sky with ease and not stress any of the seams.
What happens is that these two open seams create a diamond pattern. I left my diamonds open. Yes open! Like I said, I like a lot of armpit freedom, and because this garment is so warm and bulky, I thought I would appreciate just a little bit of air flow to my armpits. But remember, I get claustrophobic. So, if you want you're garment zipped up tight, simply sew an extra diamond shaped piece of hide (or cloth) into this space.

See the diamond?
That's what you're seeing on this Syrian dress. It's what looks like an added triangular piece of cloth. It's really a diamond shape sewn into this hole.

I even looks like some similar business is going on on this Sioux dress. Instead of adding diamonds, it looks like that extra fabric was part of the bottom hide, which was cut in such a way as to leave those shapes. The wearer of this dress, like the Syrian dress, had good range of motion with her arms.

Okay, stitches. I chose to sew this garment with very fine buckskin thong, because I like how strong and snug seams sewn with buckskin thong are. But you could use something much finer, like sinew.

I keep this stitch primer I made in a workshop with Charity Cimarron, a very accomplished seamstress of buckskin and leather. It helps keep me in line by reminding me of these six basic stitches and of her wagging her finger at me in my mind. (I have a history or childish stitching). From left to right is a 1 welt, 2 "baseball" stitch, 3 uh X stitch? (and 4 double X stitch), 5 fancy pants X stitch, and a 6 French twist.
So, I can't remember their names. But what's important is that you poke your awl holes 1/4th inch in from the edge of the leather, and 1/4th inch apart. There was no place on this garment where it made sense to do a welt (this is more necessary on bags where seams are going to take a lot of pressure and wear and tear over time). I used the single "X" stitch (#3) for most of the joined seams of the garment, the French twist (#6) for the raw edges of the garment (like around the neck, and around the diamonds), and the baseball stitch (#2), for the long seams along the bottom of the sleeves.
The best way to cut buckskin thong (or fringe) in on a soft wood board (like pine or poplar), with a very sharp knife. Not scissors. With a knife, you actually have more control, and can cut finer and more even thong (or fringe). You can see all the long cut marks (and awl points) in this board from this project.

Cut thong from a buckskin hide lengthwise. Meaning from the top of the hide (the neck) to the bottom (the rump) in one straight line (or you could go from the bottom to the top). Don't do that cutting a long line of thong from a circle by going round and round thing that people talk about. That does not create strong thong, because the cord will always be weaker on one side than the other and not balance stress evenly.
I keep a hide that is purely for cutting thong and small scraps. It's beat-up looking buckskin with shreds of grain still left on and some holes from mold to the hide before it was tanned. It wouldn't look so great made into a garment. But for thong, it's perfect! So remember, every hide has a purpose! Even the ones that don't come out perfectly the way you hoped. Without my buckskin scrap hide, my last five leather working projects wouldn't have been possible. It is literally the glue that holds all the other hides together. Like peanut butter...(okay it must be getting late)
The buckskin thong I cut for this project is the thinnest width that will still hold its strength (meaning not break when you pull on it). Well, as thin as I can go anyway. Thin thong makes neat and tidy stitches. And, the leather of these rabbit furs is so thin, I feel like anything thicker would have pulled out the holes.

When stitching leather, first poke the holes into the garment (1/4th inch apart using a measuring stick) using a sharp metal awl on a cutting board. After you've poked the entire line of holes for that seam, and cut your long piece of buckskin thong, I rub the tips of the thong onto a hunk of beeswax, to make them stiff and pointy. This way its much more possible to push the tips through the holes. Before inserting the tip of the thong in each hole, I use a bone awl to gently open up the next hole to the perfect size. You don't ever want your holes to be too big. When you pull a leather thong through a hole, its ideal if you feel some resistance. This makes for a tighter, snugger stitch that will hold together better over time. Loose holes mean weak stitches and seams. Leather punches, which punch out a small circle in the leather to make a hole, have no place here. That would make an inferior seam.
I'm not going to lie to you, sewing fur hides with buckskin thong is much more difficult and time consuming than sewing hair-off leather. Because the fur gets in the way so much. It wants to pull backwards through the holes, and also obscure the holes so that you can't find them when you need to insert the thong.
I'm still a beginner at stitching furs. I've heard of people smearing aloe on the seam to stiffen the fur. It may also be the case that sewing fur with with a needle and sinew just makes more sense. The entire construction of this garment took me 115 hours. I'd say 50- 70 % of that time was spent stitching. Yeah. It was slow. I'm slow at everything hide related. (If you haven't heard I'm probably one of the slowest tanners around. Because I'm a perfectionist.)
You need to treat leather edges differently than fabric edges. With fabric, we usually hem an edge, by folding it over twice and stitching it down. This is to keep the woven fabric from unraveling. The fibers that make up leather aren't woven in a linear way. Leather fibers are densely arranged in a chaotic way. This means that leather is able to change shape much more willingly than is woven fabric.
This is a much bigger deal when making garments from buckskin. An unsewn, raw edge on a buckskin garment will stretch out dramatically once the garment gets wet. And it won't go back into place. This can change the shape of an entire garment considerably and for the worst! Vegetable tanned leather, especially with an intact grain, changes shape less.
Sewing a line of tight stitches along a leather edge keeps that edge from stretching both by holding it in place and by taking on some of the burden of any stress born by that part of the garment. This is one of the harder things to explain in writing. It's best understood by feel. You'll know what I'm talking about when you tug on an edge like this in all directions, before a row of stitches and after. It makes a big structural difference, even though it look like a pretty decoration.

That's about all I have to say about this garment. I'll take some better pictures on-the-body when I'm not in 100 degree South Florida. Here are the garment's dirty details:
This project was 3 years in the making. It took my 9 supplest, vegetable tanned domestic rabbit hides (including the 2 nicest rabbit furs I've ever tanned, which I'd been holding onto for 3 years). Constructing the garment took 115 hours, in 20 days, spaced over over about a month. Tanning a single domestic rabbit fur is a process that generally takes me a couple of weeks. I imagine that tanning one hide probably takes me 5-8 hours of labor on average (which includes wild harvesting the plants I use for tanning and making my tannin solutions). So on estimate, this garment took about 170 hours to create. Most of the hides were tanned with winged sumac leaves. A couple of the hides contained tannins from blackberry leaf, black walnut husk, and hemlock bark. Being from different batches, some of the hides were softened with olive oil and some with various animal lards (like rabbit lard, bear lard, & pig lard). All are ultra thin and supple. The painting around the yoke of the garment is with black walnut ink.
Is the garment comfortable? Like wearing a rabbit fur cloud ~
Victoria Greba, September 8, 2019, Fort Myers FL